<meta name="twitter:card" content="summary_large_image">
<meta name="twitter:image" content="http://consolacao.github.io/images/abstract-1.jpg">
<meta name="twitter:creator" content="<a href='https://github.com/consolacao2' class='user-mention'>@consolacao2</a>">
<meta name="twitter:description" content="Ein Test aus der Lochervilla">
<meta name="twitter:title" content="Facebook Album Embed">
<meta name="twitter:url" content="http://consolacao.github.io/FacebookAlbumEmbed/">
<meta name="twitter:domain" content="">
<meta name="twitter:site" content="">
<meta name="twitter:app<img class='emoji' title=':id:' alt=':id:' src='https://assets.github.com/images/icons/emoji/id.png' height='20' width='20' align='absmiddle' />iphone" content="">
<meta name="twitter:app<img class='emoji' title=':id:' alt=':id:' src='https://assets.github.com/images/icons/emoji/id.png' height='20' width='20' align='absmiddle' />ipad" content="">
<meta name="twitter:app<img class='emoji' title=':id:' alt=':id:' src='https://assets.github.com/images/icons/emoji/id.png' height='20' width='20' align='absmiddle' />googleplay" content="">
<meta name="twitter:app:url:iphone" content="">
<meta name="twitter:app:url:ipad" content="">
<meta name="twitter:app:url:googleplay" content="">
team
fblike
Venezia
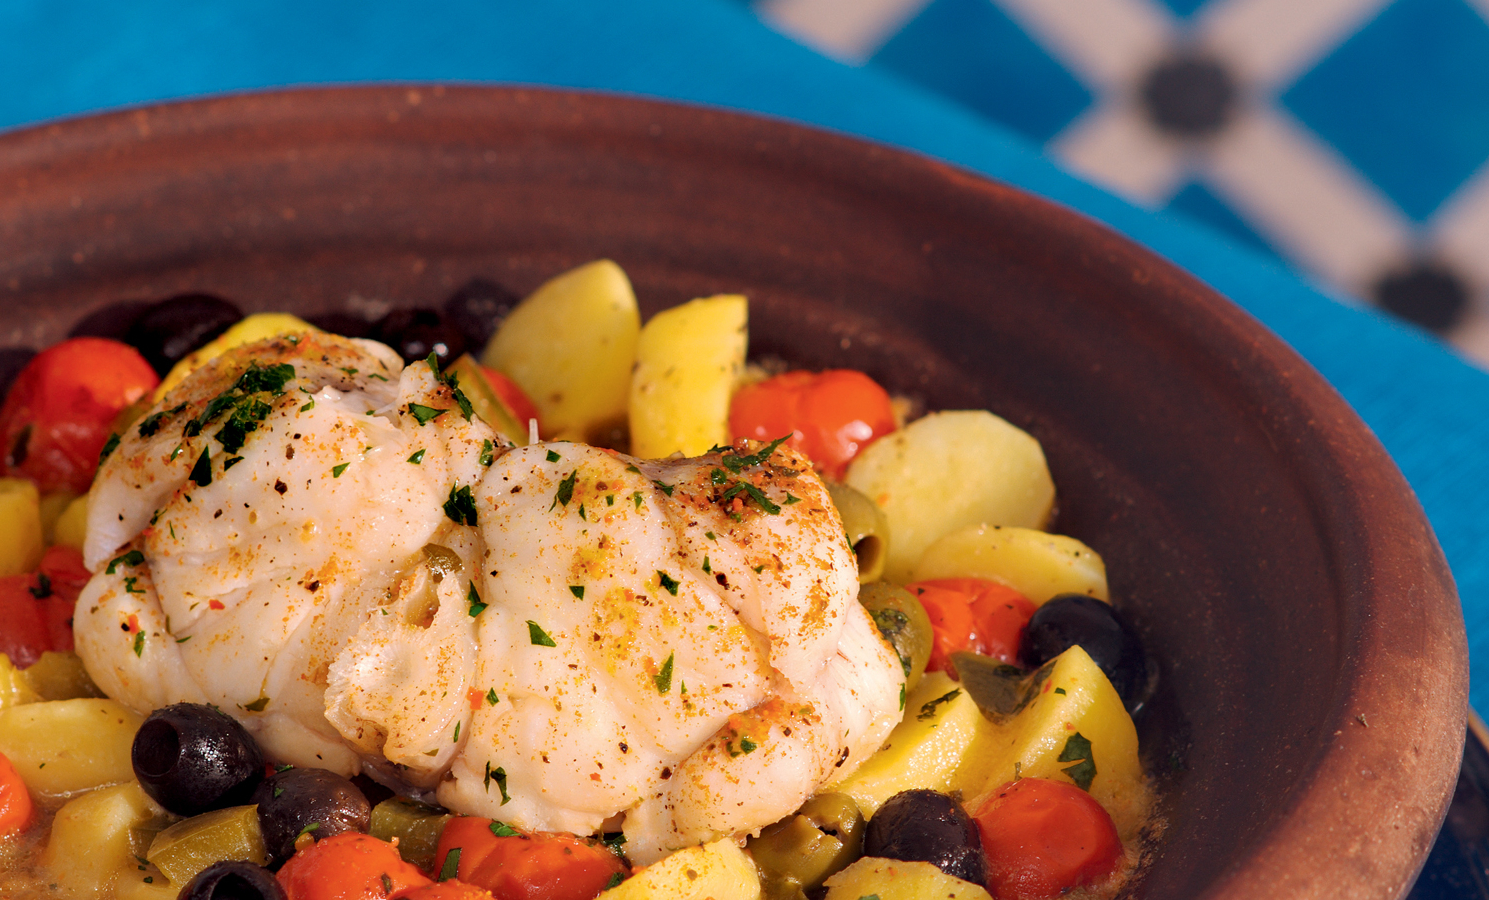
#### Artischocken mit Vinaigrette
Vorbereitung: 15 Minuten
##### Garzeit: 30 Minuten ##### Für 2-3 Personen
Zutaten
- 3 Artischocken
- 100 ml Gemüsefond
Für die Vinaigrette
- 6 EL Olivenöl
- 2 EL Weißwein- oder Rotweinessig
- 1 TL scharfer Senf
- Kräutersalz
- Schwarzer Pfeffer, frisch gemahlen
Die Tajine wie gewohnt zehn Minuten wässern. Inzwischen die Artischocken putzen: den Stiel herausbrechen und die harten Blätter um den Stielansatz herum herausziehen. Die Artischocken aufrecht in die Tajine stellen, den Gemüsefond dazugießen, den Deckel auflegen, in die Dampfsperre kaltes Wasser geben und die Artischocken etwa 30 Minuten dünsten.
Für die Vinaigrette Olivenöl, Essig, Senf, Kräutersalz und Pfeffer in ein sauberes Glas mit Schraubverschluss füllen, das Glas verschließen und kräftig schütteln. In eine hübsche Schale gießen und als Dip zu den Artischocken servieren.
Tipp
Zum Verzehren der Artischocken die Blätter nacheinander herausziehen, in die Vinaigrette tauchen und das Fruchtfleisch mit den Zähnen abstreifen. Dann das Heu vom freigelegten Artischockenboden entfernen und den Boden genießen.
Referenzierung
[Google][google] is a popular search engine and [Wikipedia][wiki] an online encyclopedia.
Gist embed
Deep Vegan
Deep Vegan
Vorbereitung: 20-25 Minuten
##### Garzeit: 25-30 Minuten ##### Für 4 Personen
Zutaten
- ½ Blumenkohl
- ½ Hokkaidokürbis
- 4-5 Kartoffeln
- 1 Rote Bete
- 1 Tomate
- 1 Zwiebel
- 1 Knoblauchzehe
- 2-3 EL Olivenöl
- ½ TL Koriandersamen
- 1 TL Senfsamen
- 1 TL Schwarzkümmelsamen
- 200 ml Sojasahne
- 2 EL weißes Mandelmus
- 1 Bund glatte Petersilie
- 1 TL Currypulver nach Belieben
- Pfeffer, frisch gemahlen
- Kräutersalz
Die Tajine wie gewohnt zehn Minuten wässern. Die Zwiebel und den Knoblauch schälen und fein hacken. Die Tomate in Scheiben schneiden und den Stielansatz entfernen. Die Kartoffeln und die Rote Bete schälen und in mundgerechte Stücke schneiden. Den Blumenkohl in feine Röschen zerteilen. Den Kürbis von Kernen und Fasern befreien und ebenfalls in Stücke schneiden.
Die Tajine innen mit Olivenöl einreiben. Zwiebeln, Knoblauch, Koriander- und Senfsamen bei starker Hitze anbraten, bis die Samen anfangen zu knacken. Tomate, Rote Bete, Kartoffeln, Blumenkohl und Hokkaidokürbis in dieser Reihenfolge in der Tajine aufschichten. Mit dem Schwarzkümmel bestreuen und mit einer Tasse Wasser ablöschen.
Den Tajinedeckel auflegen, die Dampfsperre mit kaltem Wasser füllen und das Gemüse 20-25 Minuten bei mittlerer Hitze weich garen. Währenddessen die Petersilie waschen und trocken schütteln, die Blätter von den Stielen zupfen und hacken. Sojasahne, Mandelmus, Petersilie und Currypulver verrühren, mit Pfeffer und Salz würzen und zehn Minuten vor Ende der Kochzeit in die Tajine geben.
Dazu passt gut: Basmatireis und knackiger Bataviasalat.
Tajinerezept
Video embeds are responsive and scale with the width of the main content block with the help of FitVids.
Not sure if this only effects Kramdown or if it’s an issue with Markdown in general. But adding YouTube video embeds causes errors when building your Jekyll site. To fix add a space between the <iframe> tags and remove allowfullscreen. Example below:
<iframe width="560" height="315" src="//www.youtube.com/embed/SU3kYxJmWuQ" frameborder="0"> </iframe>
https://www.youtube.com/watch?v=xoo739iYPMk
Snippets
Syntax highlighting is a feature that displays source code, in different colors and fonts according to the category of terms. This feature facilitates writing in a structured language such as a programming language or a markup language as both structures and syntax errors are visually distinct. Highlighting does not affect the meaning of the text itself; it is intended only for human readers.
Pygments Code Blocks
To modify styling and highlight colors edit /assets/less/pygments.less and compile main.less with your favorite preprocessor. Or edit main.css if that’s your thing, the classes you want to modify all begin with .highlight.
#container {
    float: left;
    margin: 0 -240px 0 0;
    width: 100%;
}
Line numbering enabled:
1 <nav class="pagination" role="navigation">
2     {% if page.previous %}
3         <a href="{{ site.url }}{{ page.previous.url }}" class="btn" title="{{ page.previous.title }}">Previous article</a>
4     {% endif %}
5     {% if page.next %}
6         <a href="{{ site.url }}{{ page.next.url }}" class="btn" title="{{ page.next.title }}">Next article</a>
7     {% endif %}
8 </nav><!-- /.pagination -->
module Jekyll
class TagIndex < Page
def initialize(site, base, dir, tag)
<a href='https://github.com/site' class='user-mention'>@site</a> = site
<a href='https://github.com/base' class='user-mention'>@base</a> = base
<a href='https://github.com/dir' class='user-mention'>@dir</a> = dir
<a href='https://github.com/name' class='user-mention'>@name</a> = 'index.html'
self.process(<a href='https://github.com/name' class='user-mention'>@name</a>)
self.read_yaml(File.join(base, '_layouts'), 'tag_index.html')
self.data['tag'] = tag
tag_title_prefix = site.config['tag_title_prefix'] || 'Tagged: '
tag_title_suffix = site.config['tag_title_suffix'] || '–'
self.data['title'] = "#{tag_title_prefix}#{tag}"
self.data['description'] = "An archive of posts tagged #{tag}."
end
end
end
Standard Code Block
<nav class="pagination" role="navigation">
    {% if page.previous %}
        <a href="{{ site.url }}{{ page.previous.url }}" class="btn" title="{{ page.previous.title }}">Previous article</a>
    {% endif %}
    {% if page.next %}
        <a href="{{ site.url }}{{ page.next.url }}" class="btn" title="{{ page.next.title }}">Next article</a>
    {% endif %}
</nav><!-- /.pagination -->
Fenced Code Blocks
To modify styling and highlight colors edit /assets/less/coderay.less and compile main.less with your favorite preprocessor. Or edit main.css if that’s your thing, the classes you want to modify all begin with .coderay. Line numbers and a few other things can be modified in _config.yml under coderay.
#container {
    float: left;
    margin: 0 -240px 0 0;
    width: 100%;
}
<nav class="pagination" role="navigation">
    {% if page.previous %}
        <a href="{{ site.url }}{{ page.previous.url }}" class="btn" title="{{ page.previous.title }}">Previous article</a>
    {% endif %}
    {% if page.next %}
        <a href="{{ site.url }}{{ page.next.url }}" class="btn" title="{{ page.next.title }}">Next article</a>
    {% endif %}
</nav><!-- /.pagination -->
module Jekyll
class TagIndex < Page
def initialize(site, base, dir, tag)
<a href='https://github.com/site' class='user-mention'>@site</a> = site
<a href='https://github.com/base' class='user-mention'>@base</a> = base
<a href='https://github.com/dir' class='user-mention'>@dir</a> = dir
<a href='https://github.com/name' class='user-mention'>@name</a> = 'index.html'
self.process(<a href='https://github.com/name' class='user-mention'>@name</a>)
self.read_yaml(File.join(base, '_layouts'), 'tag_index.html')
self.data['tag'] = tag
tag_title_prefix = site.config['tag_title_prefix'] || 'Tagged: '
tag_title_suffix = site.config['tag_title_suffix'] || '–'
self.data['title'] = "#{tag_title_prefix}#{tag}"
self.data['description'] = "An archive of posts tagged #{tag}."
end
end
end
Facebook Album Embed
Beitrag von Harald Haesler.
www.tajine.de

Ali Baba Tajine - Webpräsenz | Relauch Nr. 4
A Work in Progress …
Dependencies and Compilation Checkers
 |
|  |
| 
Projektbeschreibung
Ausgangslage | Starting situation
Der aktuelle Internetauftritt der Firma Ali Baba Tajine www.tajine.de entspricht heute nicht mehr unseren Ansprüchen und schon gar nicht den Erfordernissen an eine benutzerfreundliche Oberfläche, die auf den verschiedensten aktuell gebräuchlichen Endgeräten (Desktops, Tablets, Mobile) funktioniert. Die letzte Hauptrevision der Site datiert aus dem Jahre 2007 und wurde seinerzeit mit der IDE Adobe GoLive CS1 (Version 7.0) initiert. Nach einer Zwischenphase, in der Wartungsarbeiten mittels Adobe GoLive CS2 (Version 8.0) erfolgten, beendete Adobe Systems Inc. im Jahre 2008 die Weiterentwicklung des Paketes und damit auch meine Arbeit an den Grundstrukturen der Website. Seit 2010 erfolgten die Aktualisierungen wahlweise in BBEdit, Textmate, Coda oder Espresso, je nachdem welche Editoren ich gerade testen wollte. Die originalen Layouts aus GoLive wurden allerdings seit 2007 nie mehr angetastet, da immer noch jede Menge propriäterer GoLive-Code residiert, der sich aus heutiger Sicht durch intransparente Implementierung und schlechte Qualität auszeichnet.
Aufgabenstellung | Tasks
#### Recherche | Research
I was experimentating with the hackathon-starter project since March 2014 - version 0.0.0. This is a very fine kickstart for me and I intend to use it as a side project for my own site.
In Germany there are not many providers who offer node.js hosting. Therefore I have to turn to deployment of static html (and .php) for commercial jobs. Nevertheless I use node.js (plus Grunt, Bower, etc.) for developing in the backend. I like the speed and the elegance of these modern tools. Today I visited sahatyalkabov.com. Great work! So I have to learn and test a lot to get similar things achieved.
I am an visual artist by profession. Drawing and painting. But since 1990 I’m working on the Mac for earning money – (QuarkXPress, InDesign, Illustrator, Photoshop and so on – all the Adobe Bullshit). I was publishing with LaTeX, too. But the terminal was not my friend for many years. After I studied a lot of theory and tested many Open Source Solutions hosted on GitHub in the past year, I’m convinced now: working in GUI applications is not necessary for numerous jobs, it is comparatively slow, strongly limited to the product philosophy and expensive. But necessary for imaging and concrete visualization.
This excursion was far too big for the beginning and so I must stop immediately. (I was writing an exposé just before, so I wrote the next chapter accidentally just in place.)
Werkzeuge | Developer tools
##### Top Level Domain * Platform: Node.js mit nvm, Ruby on Rails mit rvm * Paketverwaltung: Homebrew, Composer, Bower, npm, gem * Scaffolding and Building: Yeoman, Jekyll, Grunt * Templating, Quellcode: Handlebars, Markdown, (Jade) * Testing: Karma, Sauce Labs
Shop Domain
- Platform: Shopware CE
Design
#### Fahrplan | Roadmap #### Weitere Verbesserungen | Wishlist #### Copyright und Lizenz
Stand: 31. Mai 2014
Previous
- 1